1. Introduction
This tutorial will guide you in setting up a Smart Contract development environment from the ground up and show you how to compile, test, and run your first Rust smart contract on NEAR.
This tutorial follows all steps defined in the tutorial Building a Smart Contract in Rust (written by NEAR) using a LXC Container that runs Ubuntu 22.04.
|
2. Container creation
First,
install LXD and do the
initial
configuration.
After that,
launch
an Ubuntu 22.04 container that will be named near-tutorial:
$ lxc launch ubuntu:22.04 near-tutorial
$ lxc list
$ lxc info near-tutorial
Access the shell of the created container:
$ lxc exec near-tutorial bash
3. Container configuration and packages installation
| If you are repeating the execution of this tutorial, to skip direct to the session Creating the repository, you can restore a container snapshot. |
Change the command prompt:
$ export PS1='\u@\h:\w\n$ '
$ echo "!!" >> ~/.bashrc
Update the APT cache:
$ apt update
Install gcc (Rust will need the cc command when running the
cargo test … command for the first time):
$ apt install -y gcc
Install tree:
$ apt install -y tree
$ export TREE_CHARSET=ascii
$ echo "!!" >> ~/.bashrc
Install batcat:
$ apt install -y bat
Configure vim as your prefered editor:
$ export EDITOR=vim
$ echo "!!" >> ~/.bashrc
Configure git:
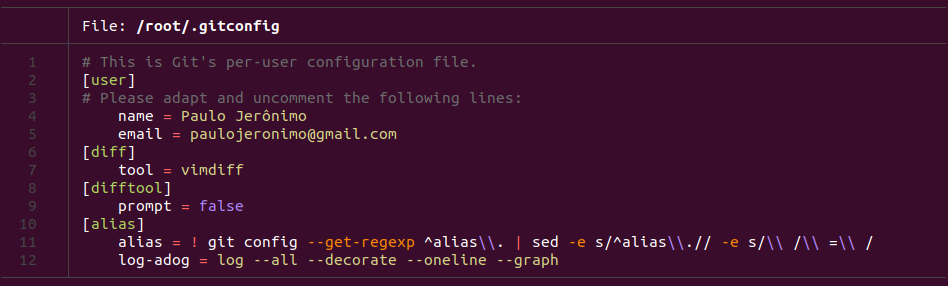
$ # Configure your username and email:
$ git config --global --edit

$ # Configure the diff tool:
$ git config --global diff.tool vimdiff
$ git config --global --add difftool.prompt false

$ # Configure some aliases:
$ git config --global alias.alias "! git config --get-regexp ^alias\\. | sed -e s/^alias\\.// -e s/\\ /\\ =\\ /"
$ git config --global alias.log-adog "log --all --decorate --oneline --graph"

$ # See the git's global configurations you made:
$ batcat ~/.gitconfig
The contents of your ~/.gitconfig should be similar (after running the
commands above) to this:
| At this point, if you intend to repeat this tutorial, you can take a snapshot of the container to skip these boring configurations the next time. |
4. Rust installation
Install Rustup and configure your current shell:
$ curl --proto '=https' --tlsv1.2 -sSf https://sh.rustup.rs | sh

$ source ~/.cargo/env
Add wasm target to your toolchain:
$ rustup target add wasm32-unknown-unknown
5. Installing nvm and node
Install nvm:
$ curl -o- https://raw.githubusercontent.com/nvm-sh/nvm/v0.39.1/install.sh | bash
$ export NVM_DIR="$HOME/.nvm"
$ [ -s "$NVM_DIR/nvm.sh" ] && \. "$NVM_DIR/nvm.sh"
Install node:
$ nvm install --lts
6. Installing the near-cli package
Ref.:
near-cli
installation:
$ npm install -g near-cli
At this point, you can again take a container
snapshot named after-installing-the-near-cli.
|
7. Creating the repository
Ref.: Repository creation:
$ cargo new rust-counter-tutorial --lib
Check the created directory structure:
$ tree rust-counter-tutorial/
rust-counter-tutorial/
|-- Cargo.toml
`-- src
    `-- lib.rs

1 directory, 2 files
Notice the generated code:
$ cd rust-counter-tutorial
$ batcat Cargo.toml
$ batcat src/lib.rs
Commit the code:
$ git status
$ git add .
$ git commit -m 'Initial commit'
$ git log-adog
$ git alias
8. Creating the files
Read
Editing
Cargo.toml, copy the content of this session to the vim editor and
save the file:
$ vim Cargo.toml
Read
Editing
lib.rs, copy the content of this session to the vim editor and
save the file:
$ vim src/lib.rs
Commit the changes:
$ git difftool
$ git add .
$ git commit -m 'Added code for the smart contract and for test it'
9. Breaking it down
Ref.: Break it down.
Before we continue, let’s review some parts of the smart contract’s source code. We’ll break down the code in pieces in the next section.
Let’s begin our review with the testing code:
The increment test:
$ batcat -r 104:147 src/lib.rs
The decrement test:
$ batcat -r 149:158 src/lib.rs
The increment_and_reset test:
$ batcat -r 160:170 src/lib.rs
The struct Counter:
$ batcat -r 18:23 src/lib.rs
The impl Counter and the fn get_num:
$ batcat -r 25:40 src/lib.rs
The fn increment:
$ batcat -r 51:60 src/lib.rs
The fn decrement:
$ batcat -r 70:79 src/lib.rs
The fn reset:
$ batcat -r 82:86 src/lib.rs
10. Test & compile
Test the code:
$ cargo test -- --nocapture
Compile the code:
$ cargo build --target wasm32-unknown-unknown --release
Notice the created .wasm files:
$ find . -type f -name '*.wasm'
./target/wasm32-unknown-unknown/release/rust_counter_tutorial.wasm
./target/wasm32-unknown-unknown/release/deps/rust_counter_tutorial.wasm
11. Testnet wallet creation
| If you don’t want to keep your wallet and if you are following this tutorial only to learn about this technology, you maybe want to use a temporary email to create your wallet. Also, to access this service maybe you want to install the Adblock Google Extension to stop its boring ads. |
My created account for this tutorial: paulojeronimo-test1
|
12. Deploying the smart contract
Login with near:
$ near login

Please authorize NEAR CLI on at least one of your accounts.

If your browser doesn't automatically open, please visit this URL
https://wallet.testnet.near.org/login/?referrer=NEAR+CLI&public_key=ed25519%3A4s1nHZeRDGE5TfFYZkzePeuxvVrGtXbMdVBZXkdvTtZT&success_url=http%3A%2F%2F127.0.0.1%3A5000
Please authorize at least one account at the URL above.

Which account did you authorize for use with NEAR CLI?
Enter it here (if not redirected automatically):
paulojeronimo-test1.testnet
Logged in as [ paulojeronimo-test1.testnet ] with public key [ ed25519:4s1nHZ... ] successfully
Your keys are saved in a JSON file in the directory
~/.near-credentials, like this:
$ tree ~/.near-credentials/
/root/.near-credentials/
└── testnet
    └── paulojeronimo-test1.testnet.json

1 directory, 1 file
Deploy the contract:
$ accountId=paulojeronimo-test1.testnet
$ near deploy --wasmFile target/wasm32-unknown-unknown/release/rust_counter_tutorial.wasm --accountId $accountId
This is the output for the command above:
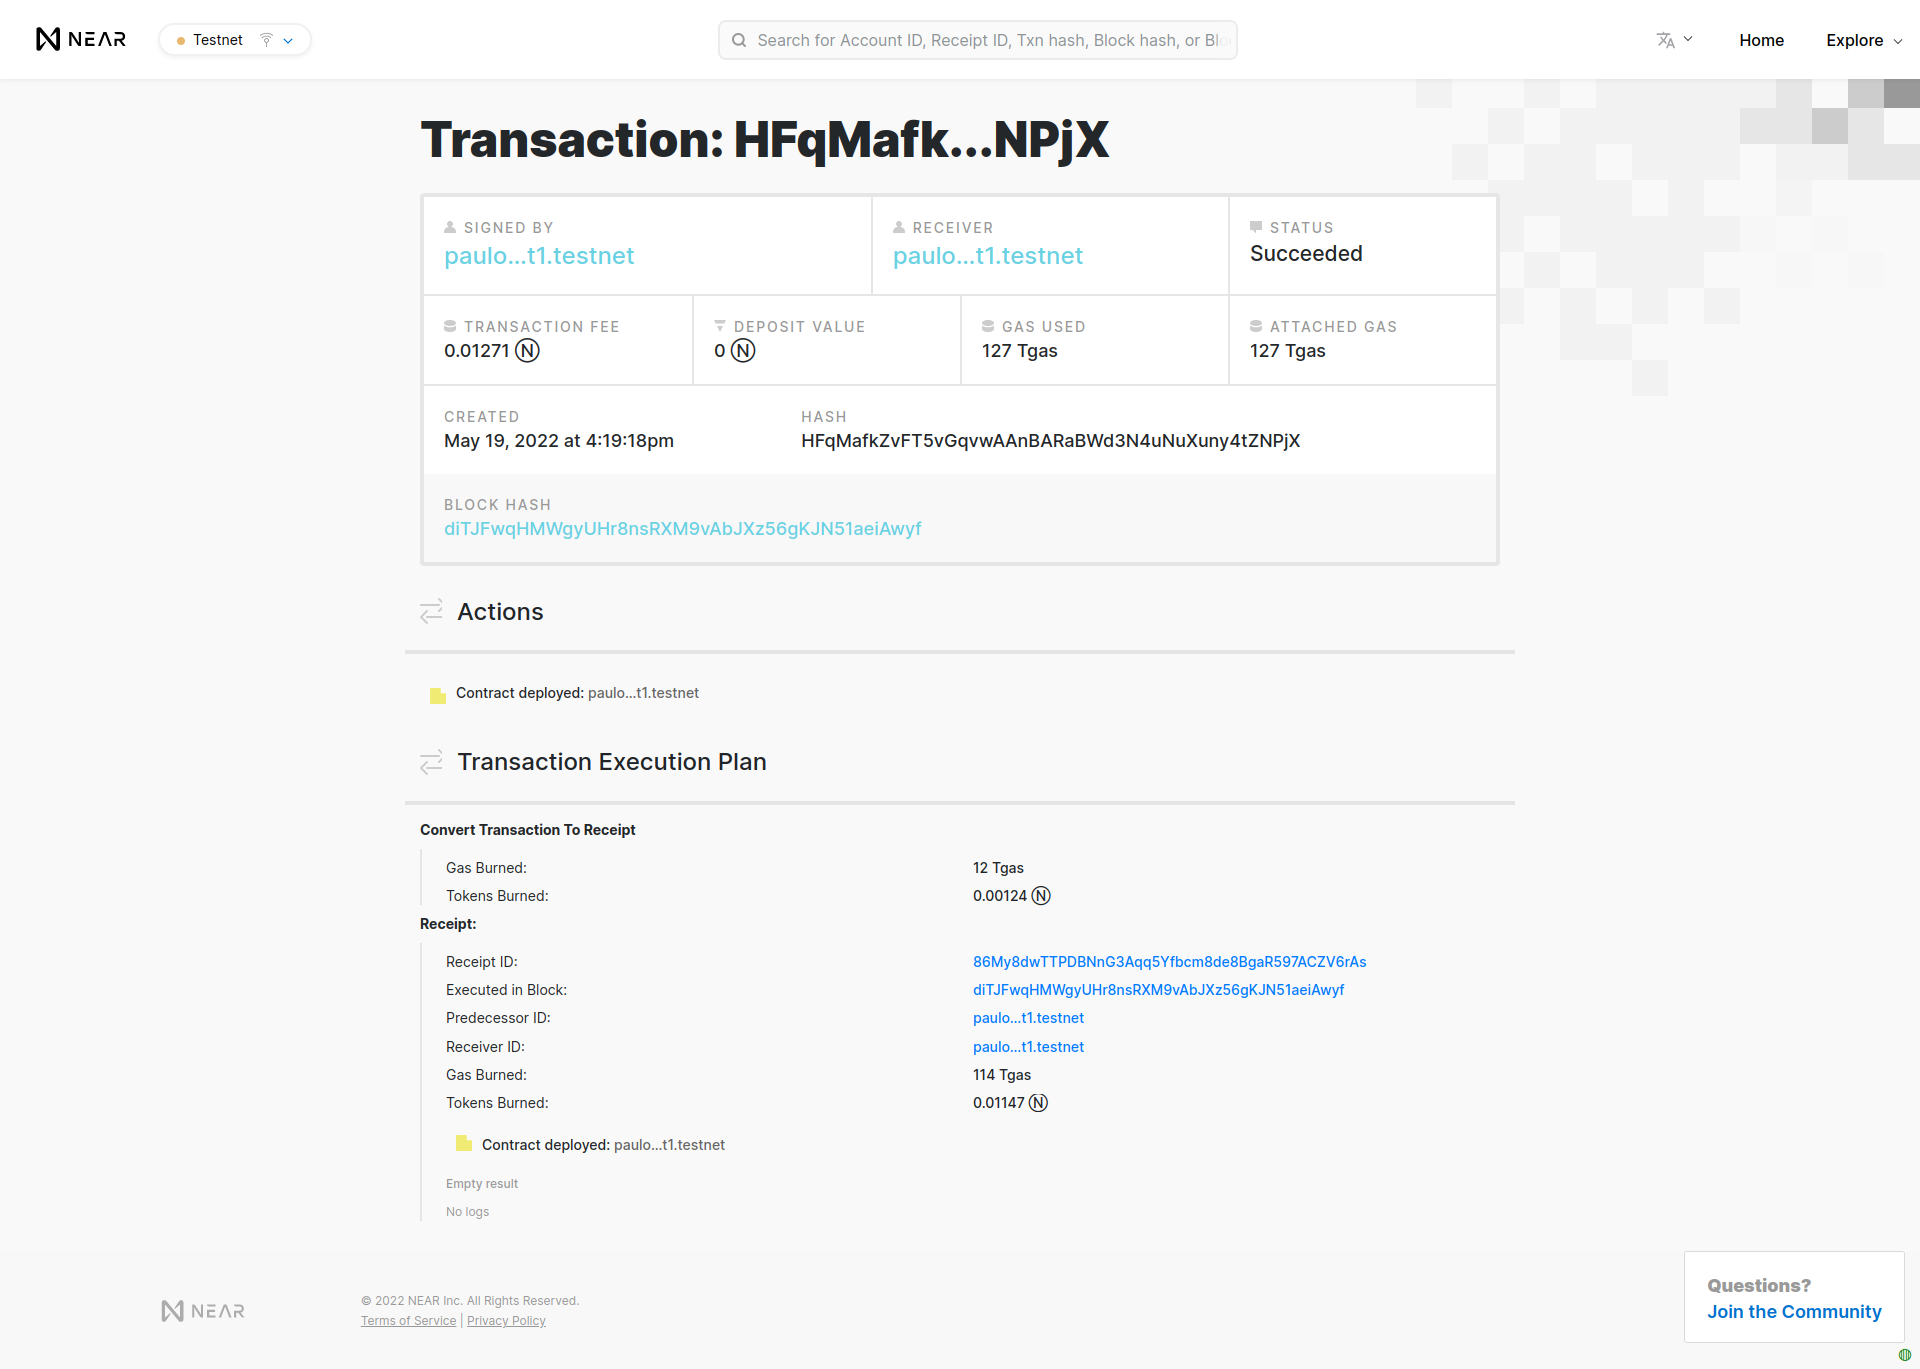
Starting deployment. Account id: paulojeronimo-test1.testnet, node: https://rpc.testnet.near.org, helper: https://helper.testnet.near.org, file: target/wasm32-unknown-unknown/release/rust_counter_tutorial.wasm
. . .
. . .
Transaction Id HFqMafkZvFT5vGqvwAAnBARaBWd3N4uNuXuny4tZNPjX
To see the transaction in the transaction explorer, please open this url in your browser
https://explorer.testnet.near.org/transactions/HFqMafkZvFT5vGqvwAAnBARaBWd3N4uNuXuny4tZNPjX
Done deploying to paulojeronimo-test1.testne
See the transacion details.
13. Invoking the methods
Test the increment function:
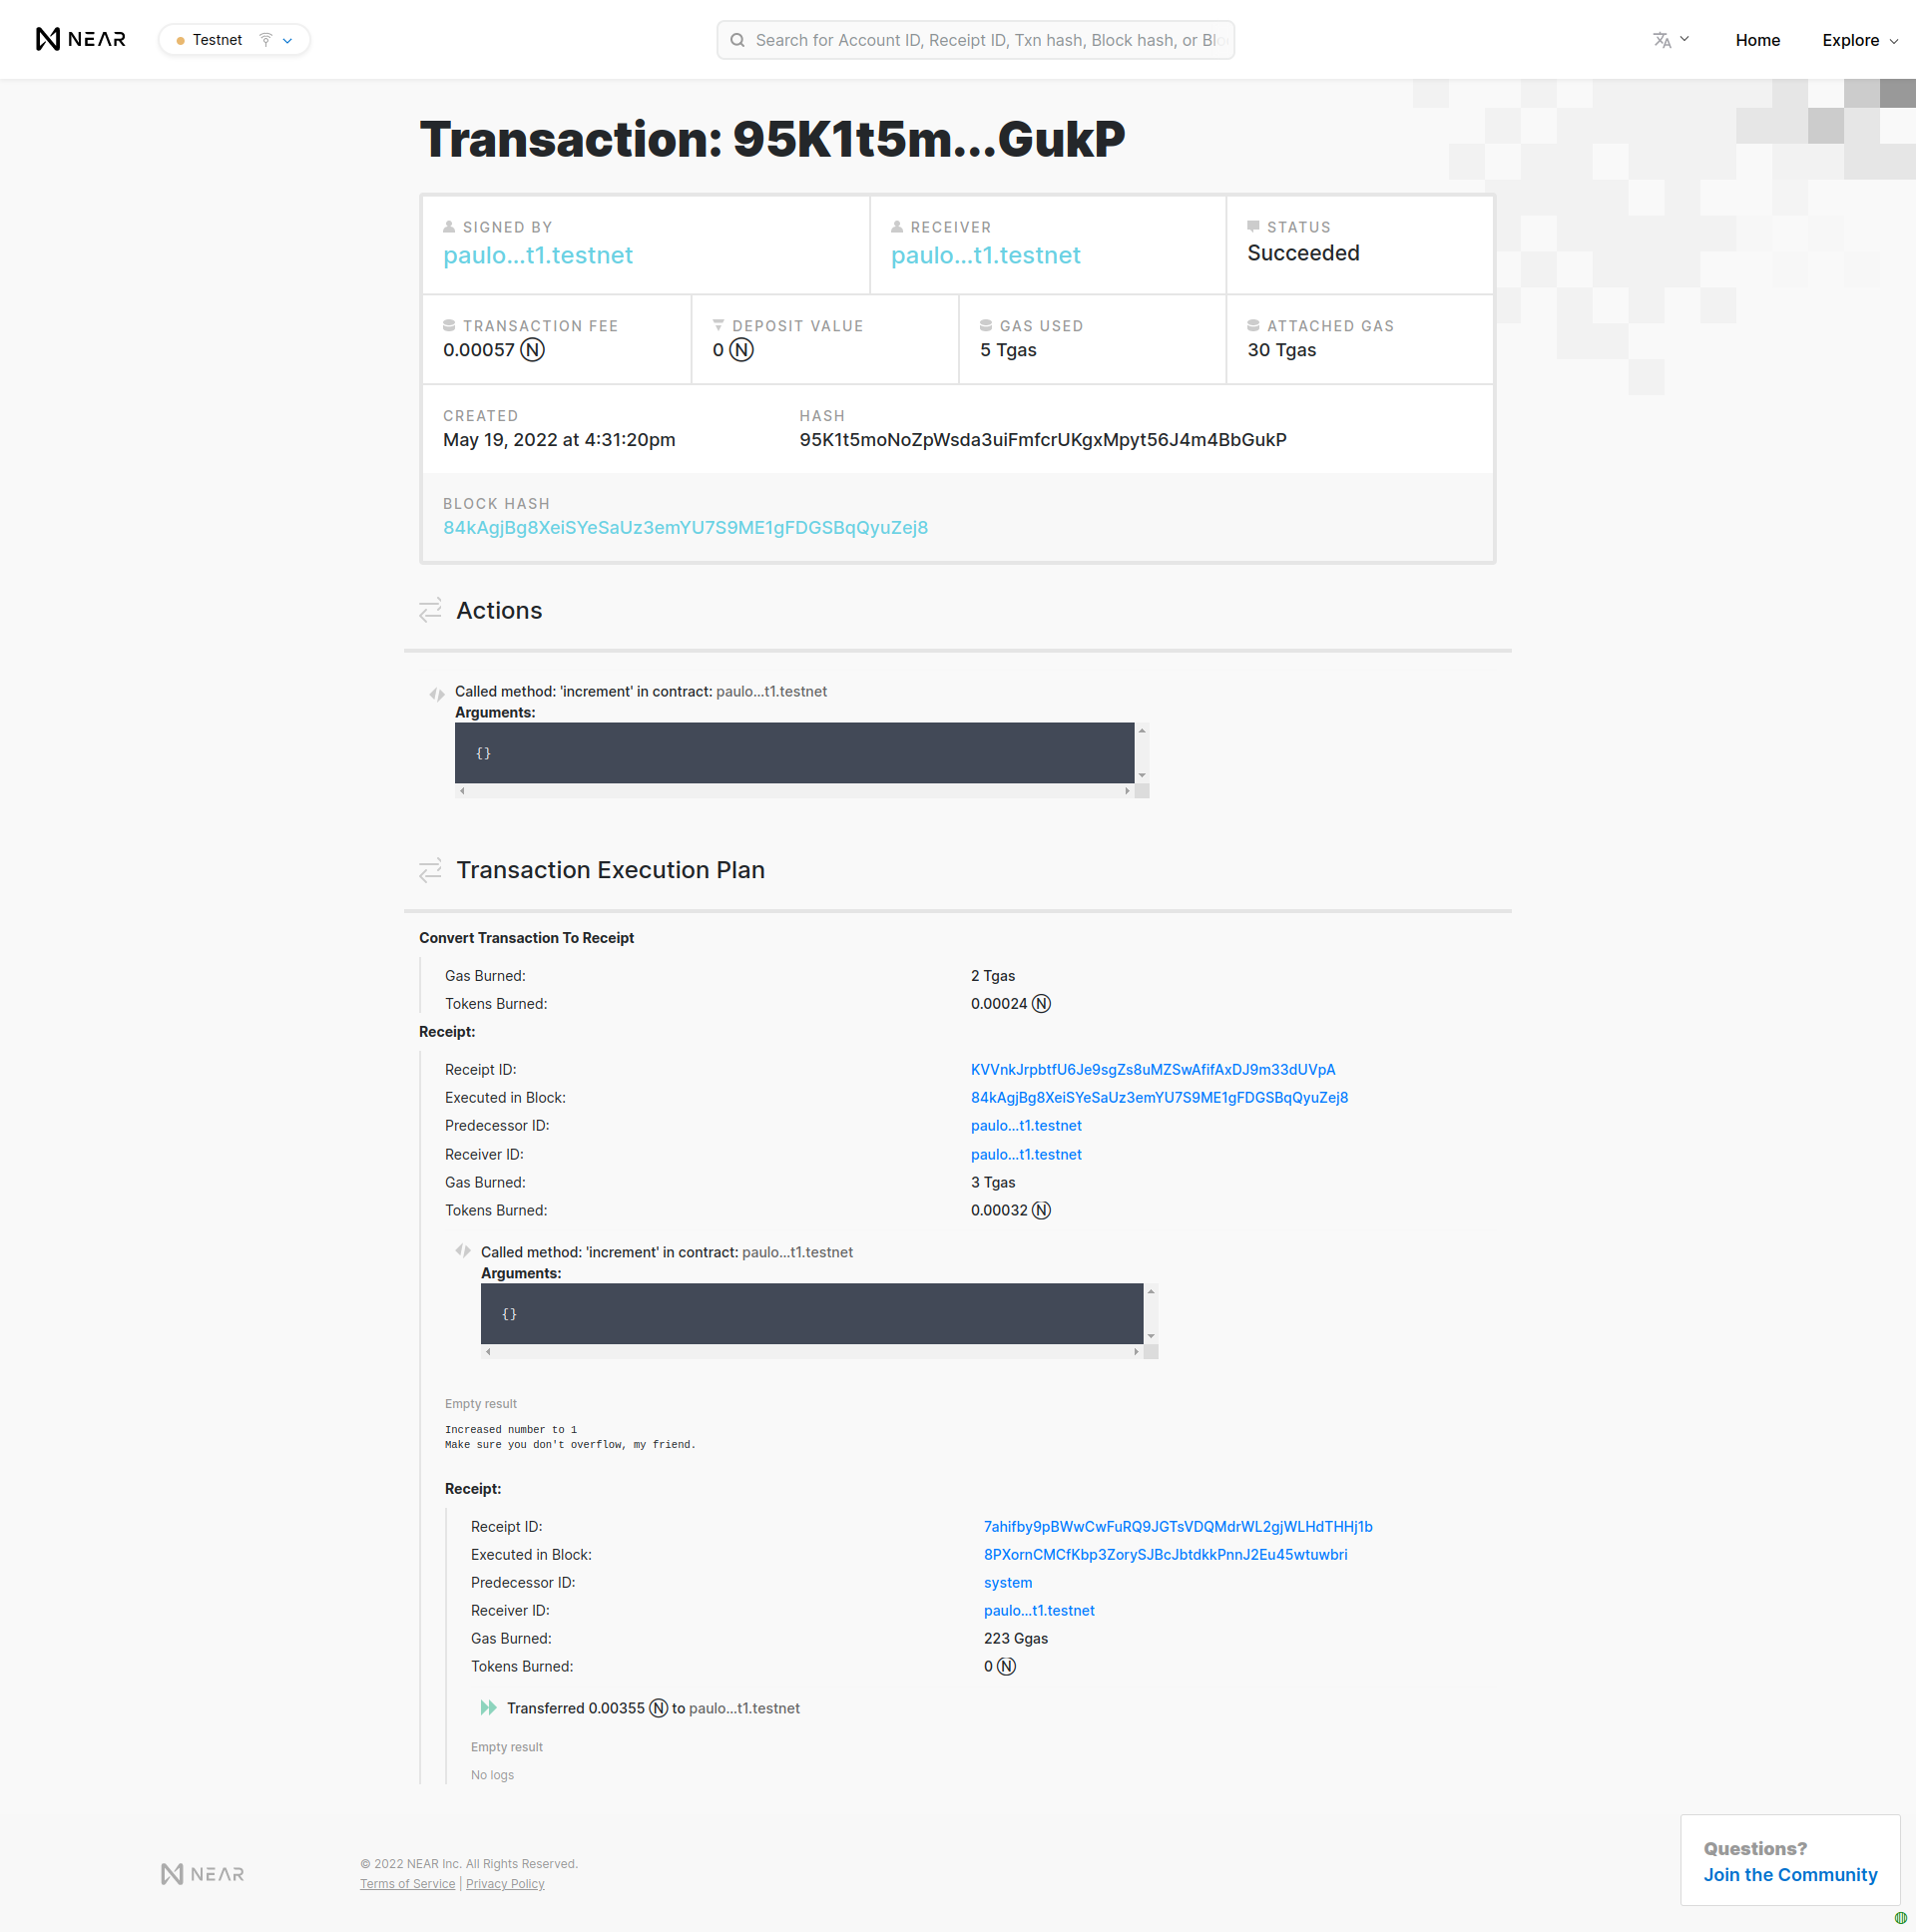
$ near call $accountId increment --accountId $accountId
Scheduling a call: paulojeronimo-test1.testnet.increment()
Doing account.functionCall()
Receipt: 7ahifby9pBWwCwFuRQ9JGTsVDQMdrWL2gjWLHdTHHj1b
	Log [paulojeronimo-test1.testnet]: Increased number to 1
	Log [paulojeronimo-test1.testnet]: Make sure you don't overflow, my friend.
Transaction Id 95K1t5moNoZpWsda3uiFmfcrUKgxMpyt56J4m4BbGukP
To see the transaction in the transaction explorer, please open this url in your browser
https://explorer.testnet.near.org/transactions/95K1t5moNoZpWsda3uiFmfcrUKgxMpyt56J4m4BbGukP
''
See the transacion details.
|
Update the $ npm i -g near-cli |
Test the decrement function:
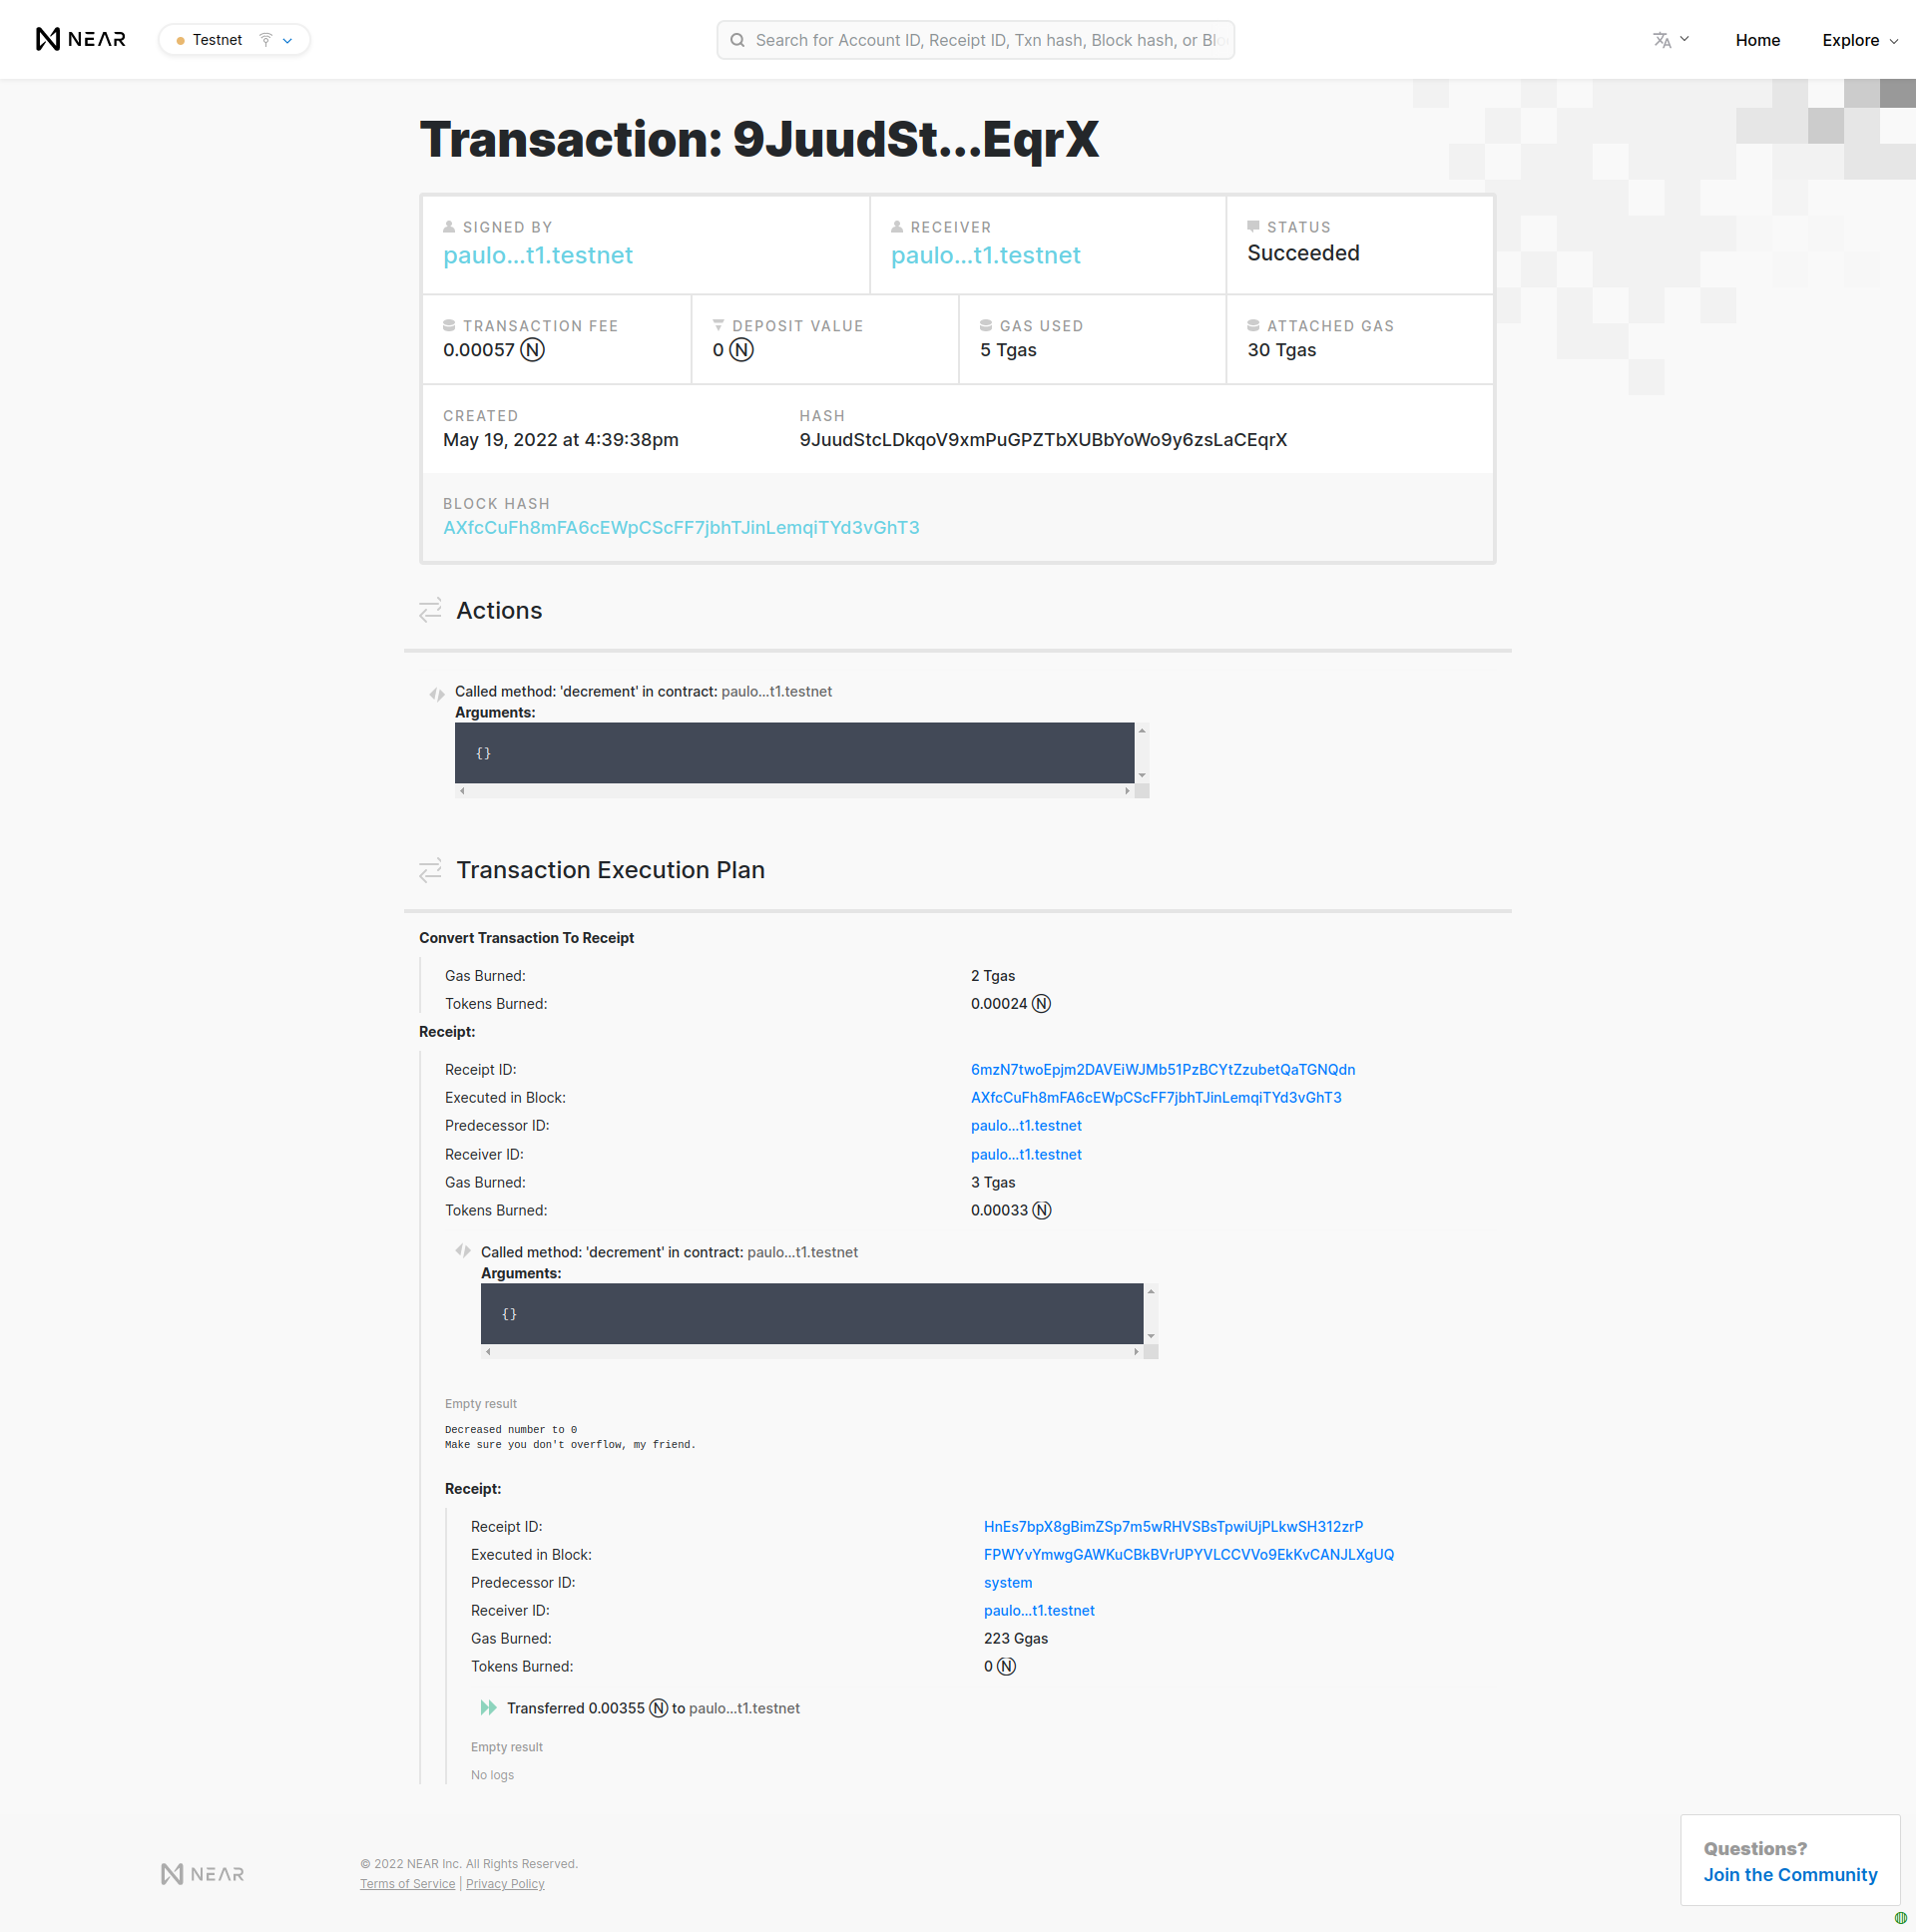
$ near call $accountId decrement --accountId $accountId
Scheduling a call: paulojeronimo-test1.testnet.decrement()
Doing account.functionCall()
Receipt: HnEs7bpX8gBimZSp7m5wRHVSBsTpwiUjPLkwSH312zrP
	Log [paulojeronimo-test1.testnet]: Decreased number to 0
	Log [paulojeronimo-test1.testnet]: Make sure you don't overflow, my friend.
Transaction Id 9JuudStcLDkqoV9xmPuGPZTbXUBbYoWo9y6zsLaCEqrX
To see the transaction in the transaction explorer, please open this url in your browser
https://explorer.testnet.near.org/transactions/9JuudStcLDkqoV9xmPuGPZTbXUBbYoWo9y6zsLaCEqrX
''
See the transacion details.
Check counter value
$ near view $accountId get_num --accountId $accountId
View call: paulojeronimo-test1.testnet.get_num()
0
14. Versioning for this article
$ node --version
v16.15.0

$ npm --version
8.10.0

$ cargo --version
cargo 1.61.0 (a028ae4 2022-04-29)

$ rustc --version
rustc 1.61.0 (fe5b13d68 2022-05-18)

$ near --version
3.3.0
15. LXC useful commands
15.1. Taking a snapshot after configuration
After the chapter Container configuration and packages installation you could stop the container and take an snapshot of it in order to restart this tutorial more quickly in a second time, if you want:
$ lxc stop near-tutorial
$ lxc snapshot near-tutorial after-configuration
See the snapshots taken:
$ lxc info near-tutorial | sed -n '/Snapshots/,$p'
Snapshots:
+---------------------+----------------------+------------+----------+
|        NAME         |       TAKEN AT       | EXPIRES AT | STATEFUL |
+---------------------+----------------------+------------+----------+
| after-configuration | 2022/05/20 04:42 -03 |            | NO       |
+---------------------+----------------------+------------+----------+
Start the container again:
$ lxc start near-tutorial
After the chapter Installing the near-cli package, you can also repeat the
steps above taking another snapshot called
after-installing-the-near-cli.
15.2. Restoring the "after-installing-the-near-cli" snapshot
$ lxc restore near-tutorial after-installing-the-near-cli
15.3. Create another container from a container’s snapshot
If you create another snapshot called after-installing-the-near-cli
you will not be able to restore the container to the snapshot
after-configuration without losing the work you did until the point
after-installing-the-near-cli.
In this case, if you try to restore the after-configuration snapshot
you will get this error:
$ lxc restore near-tutorial after-configuration
Error: Snapshot "after-configuration" cannot be restored due to subsequent snapshot(s). Set zfs.remove_snapshots to override
If you want to bypass this error, you can type:
$ lxc storage set default volume.zfs.remove_snapshots=true
After that, repeat the first command:
$ !-2
You will notice, however, that the snapshot
after-installing-the-near-cli will be lost.
Instead of running the commands above, you can create another container
from the spapshot after-configuration by typing this:
$ lxc copy near-tutorial/after-configuration near-tutorial-after-configuration