1. Environment setup
1.2. Box setup (Ubuntu 16.04)
Configure a dir for your produced sources and put it on your ~/.bashrc file:
$ readonly mysrc=~/src/produced; export mysrc
$ echo "!!" >> ~/.bashrc
Dotfiles configuration:
$ cd $mysrc && cat <<'EOF'|bash -e
mkdir -p $mysrc && cd $_
rm -rf dotfiles
git clone https://github.com/paulojeronimo/dotfiles
./dotfiles/install
EOF
$ [ $? = 0 ] && source ~/.ambiente
Configure your name and email in ~/.gitconfig:
$ vim ~/.gitconfig
2. Basic concepts
2.1. Blockchain demo
Install node:
$ ~/src/scripts/node-setup
Download and run blockchain-demo:
$ cat <<'EOF'|bash -e
cd $mysrc
rm -rf blockchain-demo
git clone https://github.com/blockchain4devs/blockchain-demo
cd blockchain-demo
npm install
PORT=8000 ./bin/www
EOF
Open http://localhost:8000 and test.
After finish your tests, press Ctrl+C at the shell running blockchain-demo.
3. Ethereum with Java
3.1. Installing Java, Maven, Gradle, and web3j
$ ~/src/scripts/java-and-tools-setup
$ vim !!
$ source ~/.sdkman/bin/sdkman-init.sh
$ cat <<'EOF'|bash
java -version
mvn -v
gradle -v
EOF
web3j setup:
$ ~/src/scripts/web3j-setup
$ vim !!
$ web3j version
3.2. web3j-demo: VersionInfo
Creating and compiling:
$ cd $mysrc
$ cp -r ../initial/web3j-demo . && cd web3j-demo
$ tree
$ vim -p pom.xml $(find . -name '*.java')
$ mvn clean package
$ git init
$ git add -A
$ git commit -m 'Initial commit'
Installing geth:
$ ~/src/scripts/ethereum-setup
$ vim !!
Running geth:
|
From this point it is best that you are using tmux. |
$ geth --rpcapi personal,db,eth,net,web3 --rpc --rinkeby
Open another terminal and type the following command to see the size of the Rinkeby Blockchain growing on your disk (press Ctrl+C to stop):
$ watch du -hs ~/.ethereum/
|
Pause for a little theory …
|
Attaching to a existing node:
$ geth attach ~/.ethereum/rinkeby/geth.ipc
> eth.syncing
> eth.blockNumber
> exit
Exploring the rinkeby (testnet) blockchain: open https://www.rinkeby.io/#explorer.
Installing your own blockchain explorer:
$ cd $mysrc && cat <<'EOF' | bash
rm -rf explorer
git clone https://github.com/etherparty/explorer
cd explorer
git apply ../../patches/explorer/1.patch
npm start
EOF
Seeing the patch (for curious):
$ vim ~/src/patches/explorer/1.patch
Open another terminal.
Stop geth and start it again with the following parameters:
$ geth --rpcapi personal,db,eth,net,web3 --rpc --rinkeby --rpcaddr='0.0.0.0' --rpccorsdomain "http://localhost:8000"
Open http://localhost:8000 on your host machine.
Patching web3j-demo (doing some additions):
$ cd $mysrc/web3j-demo && git apply ../../patches/web3j-demo/1.patch
Seeing the patch:
$ vim $_
Running the app (VersionInfo.java):
$ ./VersionInfo
The output produced will be something similar to:
...
Client version: Geth/v1.7.3-stable-4bb3c89d/linux-amd64/go1.9
Network version: 4
...
Commiting the changes:
$ git add -A
$ git commit -m 'Modifying pom.xml to execute VersionInfo'
3.3. Creating a wallet
$ web3j wallet create
...
Please enter a wallet file password: (1)
Please re-enter the password:
Please enter a destination directory location [/home/ubuntu/.ethereum/testnet/keystore]:
Creating directory: /home/ubuntu/.ethereum/testnet/keystore ...complete
Wallet file UTC--2017-11-11T03-10-00.267000000Z--6284623006d42a13050a90e343352f7e8b39ecb5.json successfully created in: /home/ubuntu/.ethereum/testnet/keystore
| 1 | web3jtest |
3.4. Viewing the wallet file
$ export wallet=`find ~/.ethereum/testnet/keystore -type f| head -n 1`
$ python -m json.tool $wallet
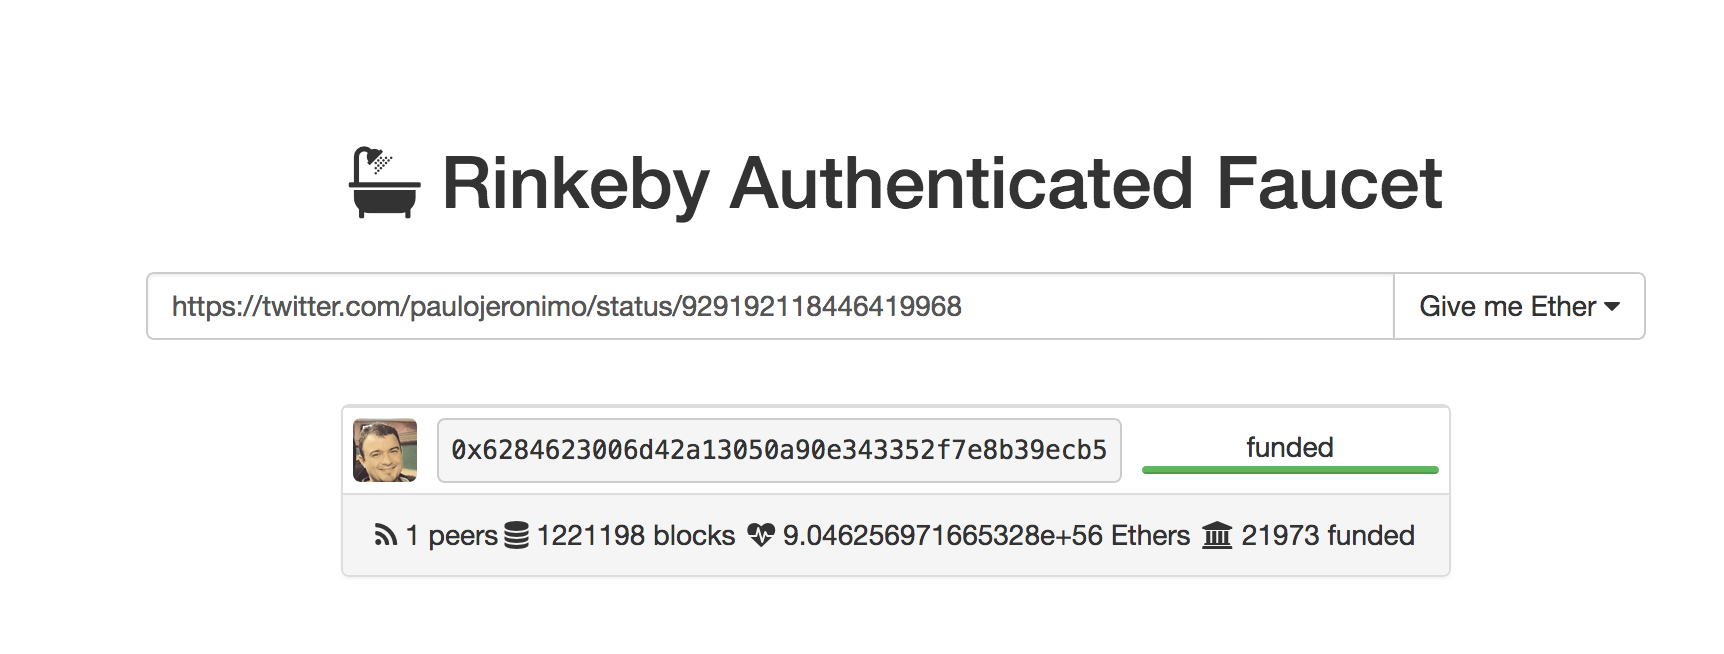
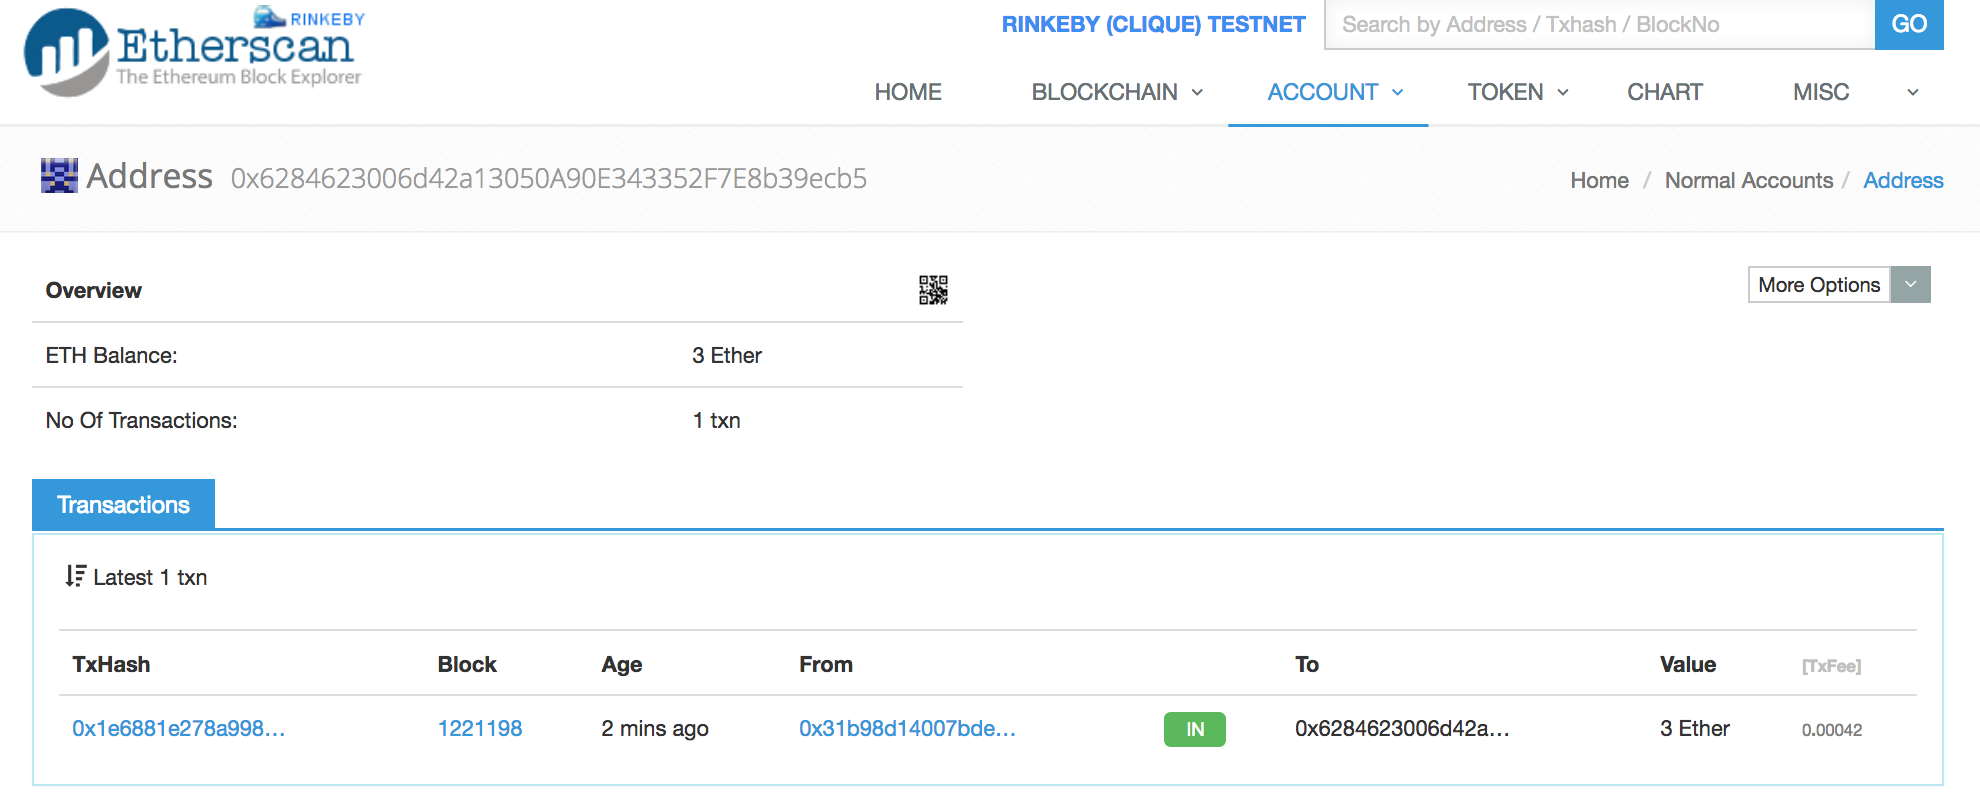
3.5. Requesting ETH
Copy your address (from $wallet).
Create a tweet with your address (0x + value) (Sample).
Open https://faucet.rinkeby.io/. Insert the URL of yor tweet.
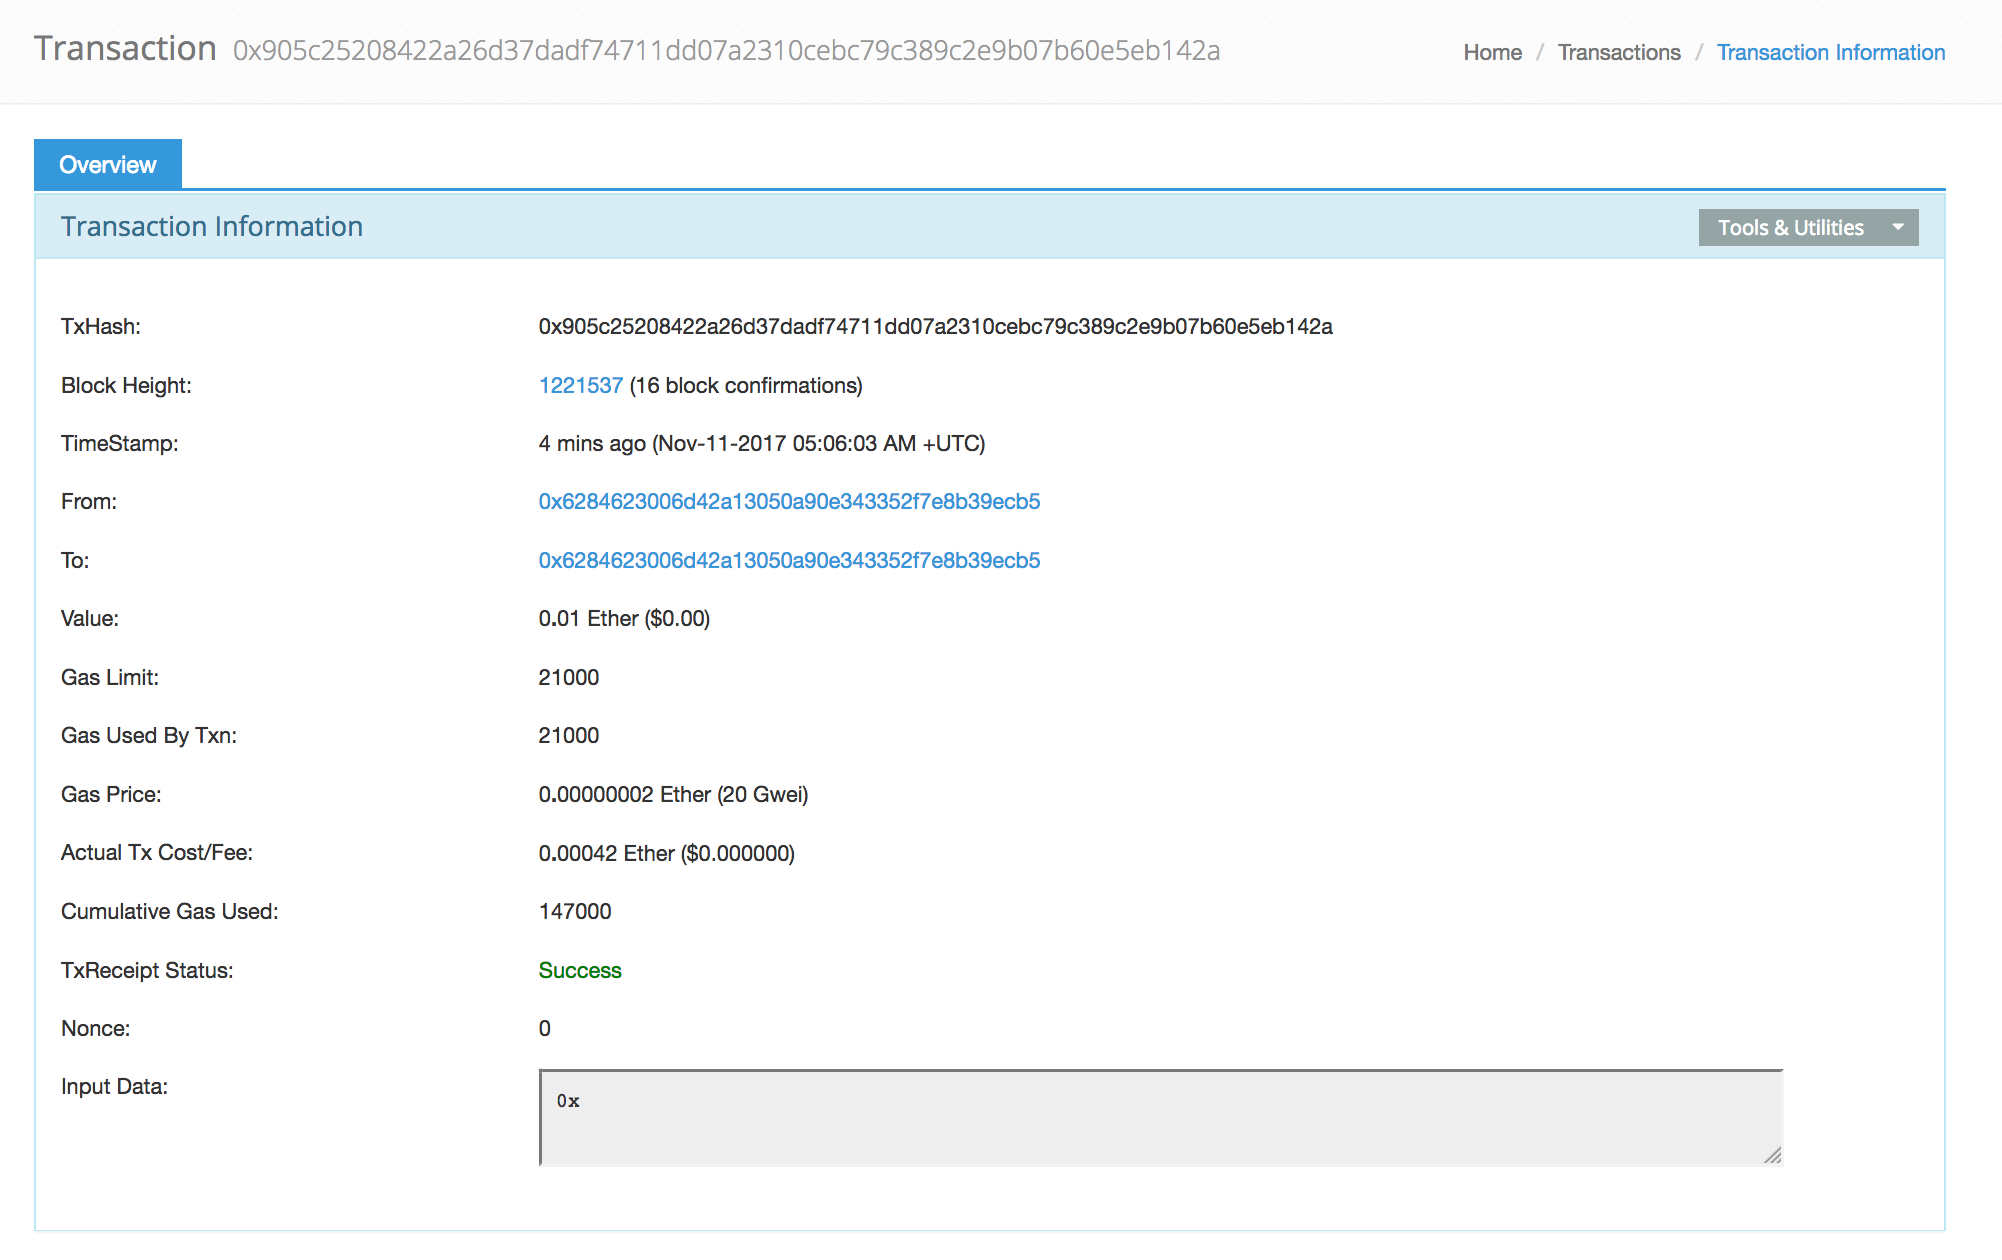
3.6. web3j-demo: Transfering
$ git apply ../../patches/web3j-demo/2.patch
$ git status
$ tree
$ git difftool pom.xml
$ vim src/main/java/com/paulojeronimo/web3j/Transfering.java
$ ./Transfering
...
Funds transfer completed...
Hash: 0x4a3c47672ebbce336861da39077c3eec1bf04db9860e51ab73adcae5ade6ae08
Block number: 1221537
...
$ git add -A
$ git commit -m 'Added transfering feature'
3.7. web3j-demo: Greeting
Creating the smart contract:
$ patch=../../patches/web3j-demo/3.patch
$ cat $patch
$ git apply $patch
Compiling the smart contract:
$ d=target/solidity; rm -rf $d && mkdir -p $d && solc src/main/resources/Greeter.sol --bin --abi -o $d
$ ls -l $d
Generating the Java code:
$ web3j solidity generate $d/greeter.bin $d/greeter.abi -p com.paulojeronimo.web3j.generated -o src/main/java
Compiling the Java code:
$ mvn clean package
Running:
$ ./Greeting
...
Greetings to the blockchain world from Paulo Jeronimo!
0x38c3feda08fdc418cfd3c169e14f2059526d686b5e1f325d9276c18816b201a7
new Greeting from Paulo Jeronimo!
...
Commiting:
$ git add -A
$ git commit -m 'Added greeting feature'
3.8. References
Articles:
YouTube:
GitHub:
3.9. Skills to be a better Ethereum Java Programmer
Java 8 features: Functional Programming, CompletableFuture.
Reactive Programming with RxJava.
4. Ethereum with JavaScript
First, stop the running geth.
This is because we will run testrpc that listens on the same port (8545)!
Download and install the application:
$ cd $mysrc && cat <<'EOF'|bash
mkdir -p javascript-demos && cd $_
rm -rf hello_world_dapp
git clone https://github.com/mjhm/hello_world_dapp
cd hello_world_dapp
npm install
EOF
Run testrpc:
npm run testrpc
Open another shell and run:
npm run http_server
Open http://localhost:8000 on your browser and test the app.
Step by step tutorial:
GitHub code:
5. Extra references
YouTube:
-
Getting Started with Ethereum Solidity Development by Sebastien Arbogast and Said Eloudrhiri
-
Why you should really care about the blockchain by Sebastien Arbogast & Said Eloudrhiri
-
Introduction to Ethereum Smart Contract Development with Solidity (Part 1)
-
Introduction to Ethereum Smart Contract Development with Solidity (Part 2)